7 Essential Exercises for Beginners: A Simple Way to Start
Knowing where to put your feet can feel more useful than another workout plan. Here are seven exercises to practise at your own pace, with clear instructions, easier versions and a simple way to fit them into your week.
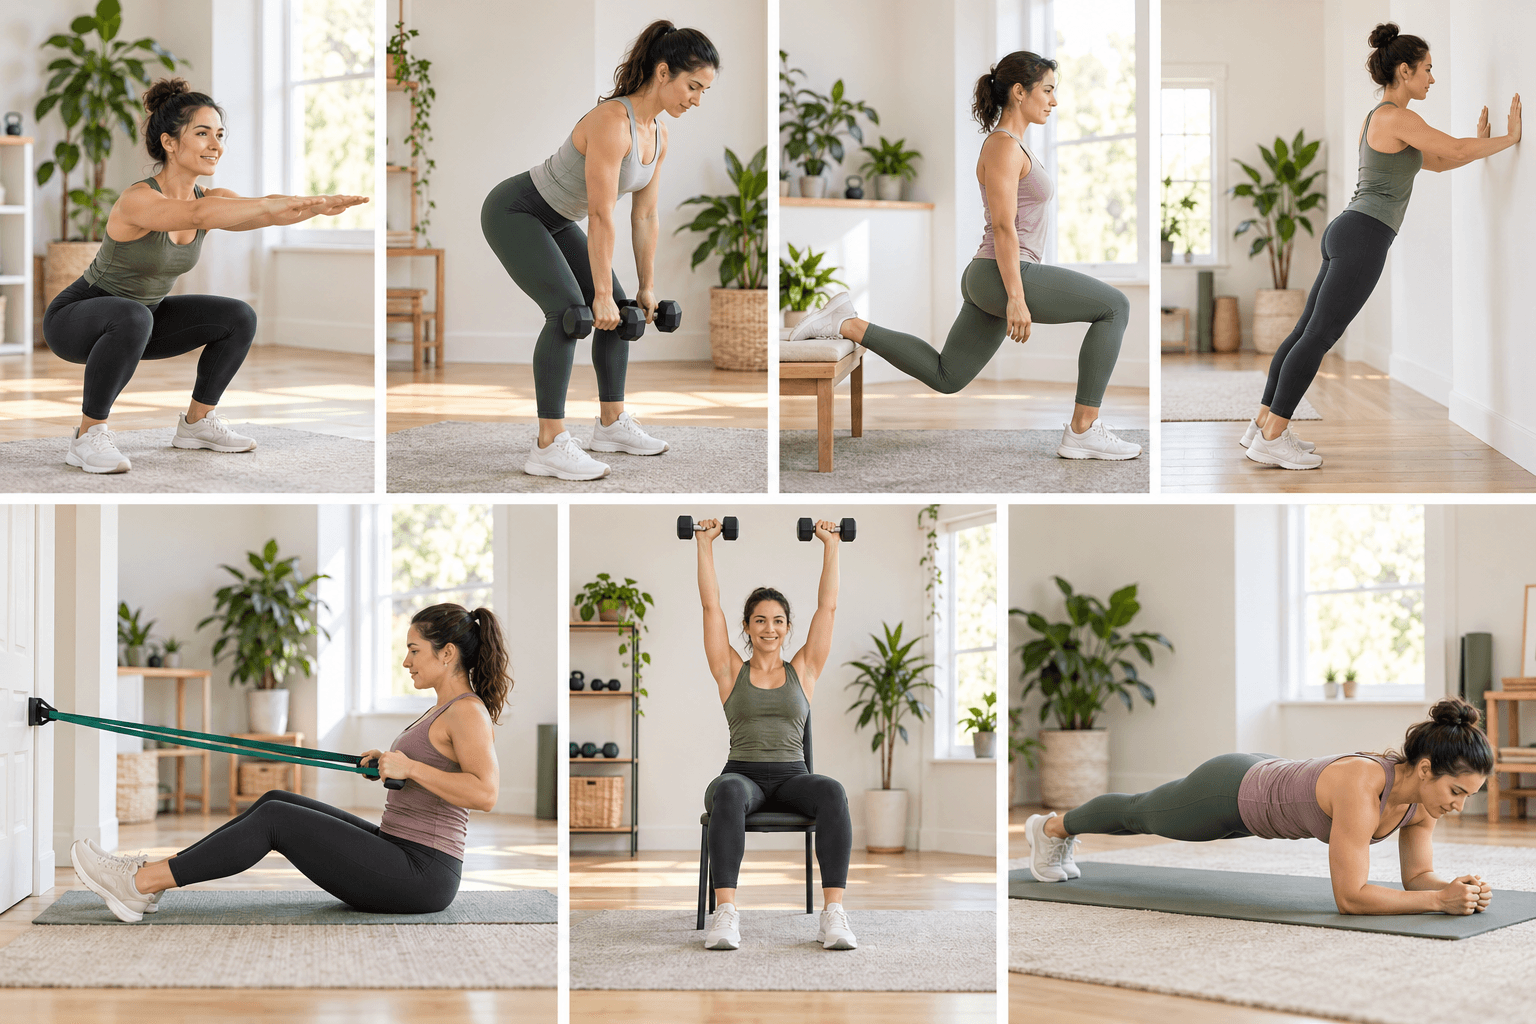
Seven exercises, and a place to begin
You’ve cleared a little space, put on something you can move in and decided to give strength training a go. Then come the small questions: How far apart should your feet be? Where do your elbows go? And how many repetitions are enough for a first attempt?
That’s where this guide starts. These seven exercises cover squatting, bending at the hips, working one leg at a time, pushing, pulling and keeping your middle steady. They’re useful movements to learn, and several will feel familiar from getting out of a chair or lifting a shopping bag.
“Essential” doesn’t mean everyone needs the same seven exercises. This is a starting selection, with room to change a movement that doesn’t suit you. Read through each setup, try a few repetitions and give yourself time to get used to it. Feeling a little awkward at first is a good reason to slow down.
Before your first rep
Choose a clear space where you can reach your arms out without hitting anything. If you’re using a chair for support, check that it won’t slide or tip; placing it against a wall can help. Have a look over any resistance band for damage before using it.
Walk around or march gently for a few minutes, then rehearse the movement without weights. For most exercises here, a first attempt might be one set of 6–10 repetitions. A rep is one complete movement; a set is a group of reps before you rest. There’s a suggested starting amount for each exercise in the table below.
Take a break whenever you need one. You should be able to get into position for the next exercise without feeling rushed. If learning all seven feels like a lot, practise a few today and come back to the others next time.
This guide is for general adult fitness. If you’re managing an injury or health condition, recovering from surgery, pregnant or recently gave birth, get advice suited to you before trying an unfamiliar routine. Stop for sharp or worsening pain. Chest pain, faintness or unusual breathlessness need medical attention.
1. Squat: sit down, then stand up
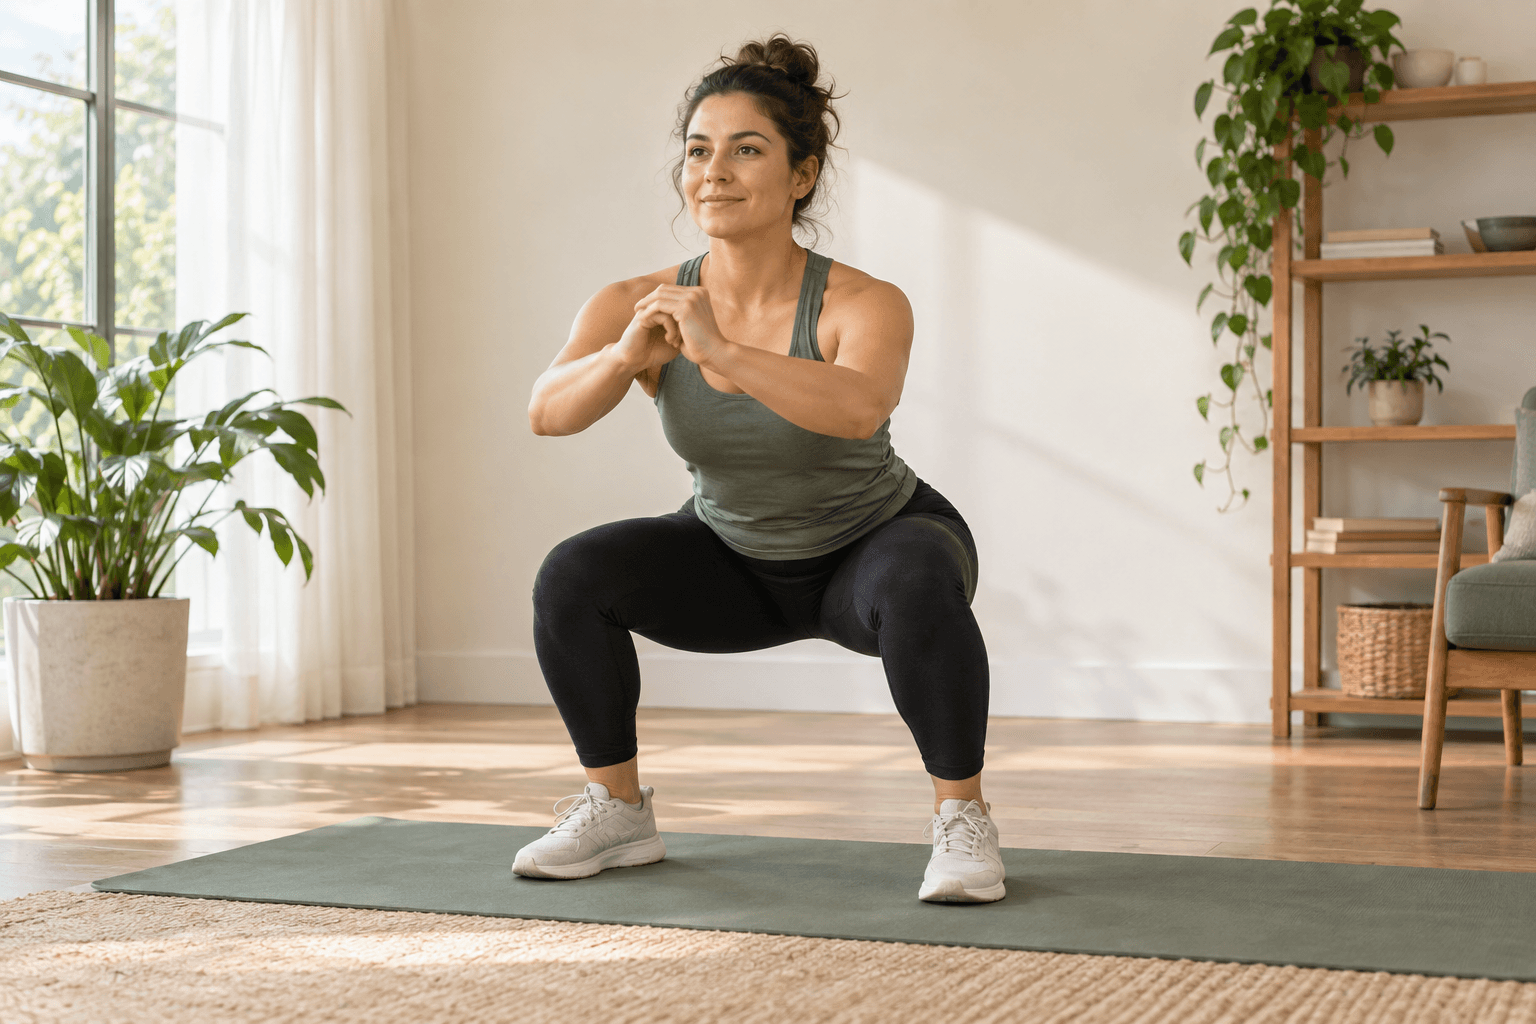
Getting up from a chair is a helpful place to start understanding a squat. Your thighs and hips do much of the work, while your feet give you a steady base. You can begin with a chair behind you to take the guesswork out of how far to lower.
- Stand with your feet about shoulder-width apart. Let your toes turn out slightly if that feels natural.
- Bend your knees and move your hips back as though you’re about to sit down. Keep your whole foot on the floor.
- Lower as far as you can without losing your balance. Reach your arms forward if it helps.
- Push through your feet to stand up. Let your knees follow the direction of your toes as you move.
A useful check: notice your heels. If they lift, try a shallower squat and adjust your stance. You don’t have to reach the same depth as the illustration.
Make it easier: sit fully onto a stable chair, pause, then stand again. Use your hands for a little help if needed, and lower yourself gently on the way back down.
2. Hip hinge: reach your hips back
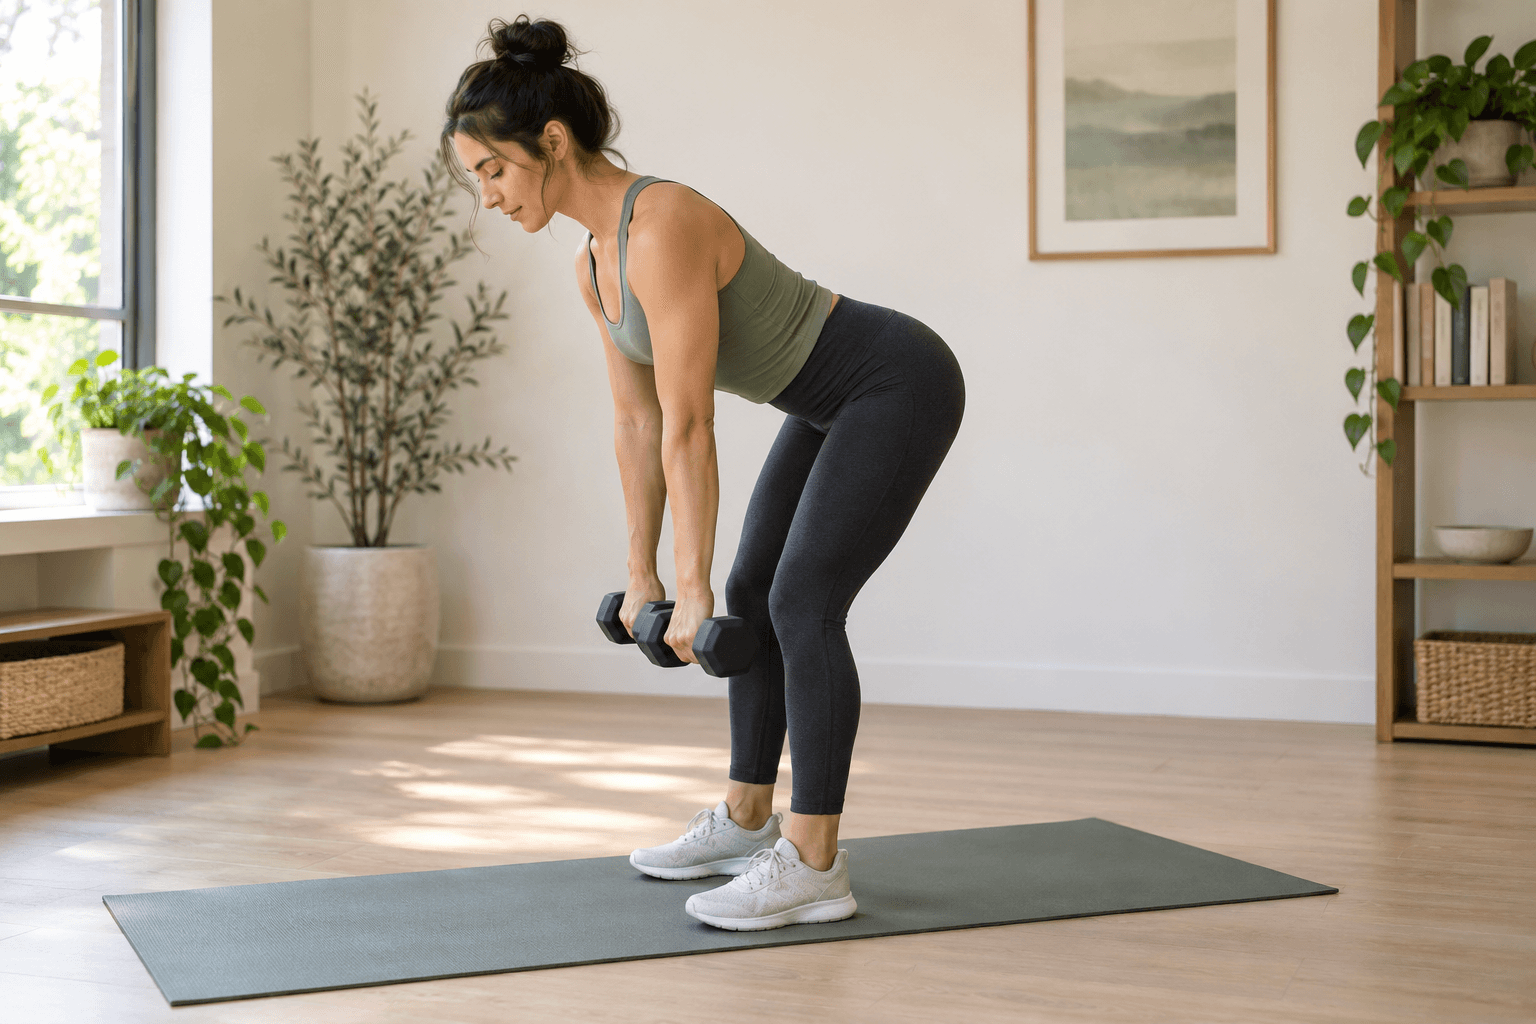
The name sounds more complicated than the movement. A hip hinge is a bend at your hips, the sort you might use to reach for a bag. You’ll work the muscles around your hips and the backs of your thighs. The image shows weights, but learn the bend with empty hands first.
- Stand with your feet hip-width apart and your knees slightly bent. Place your hands at the creases where your thighs meet your hips.
- Send your hips backwards, as if you were nudging a drawer shut with your backside. Let your chest tip forward with the movement.
- Pause when you feel a gentle stretch along the backs of your thighs, or sooner if your back starts to round or strain.
- Bring your hips forward to stand tall again. Finish upright, without leaning back.
What to notice: your hips travel backwards while your knees stay softly bent. Once that feels familiar, you can hold light weights close to your legs as shown.
Make it easier: stand a short distance in front of a wall, facing away from it. Reach your hips back to tap the wall gently. It gives you something to aim for.
3. Split squat: practise one leg at a time
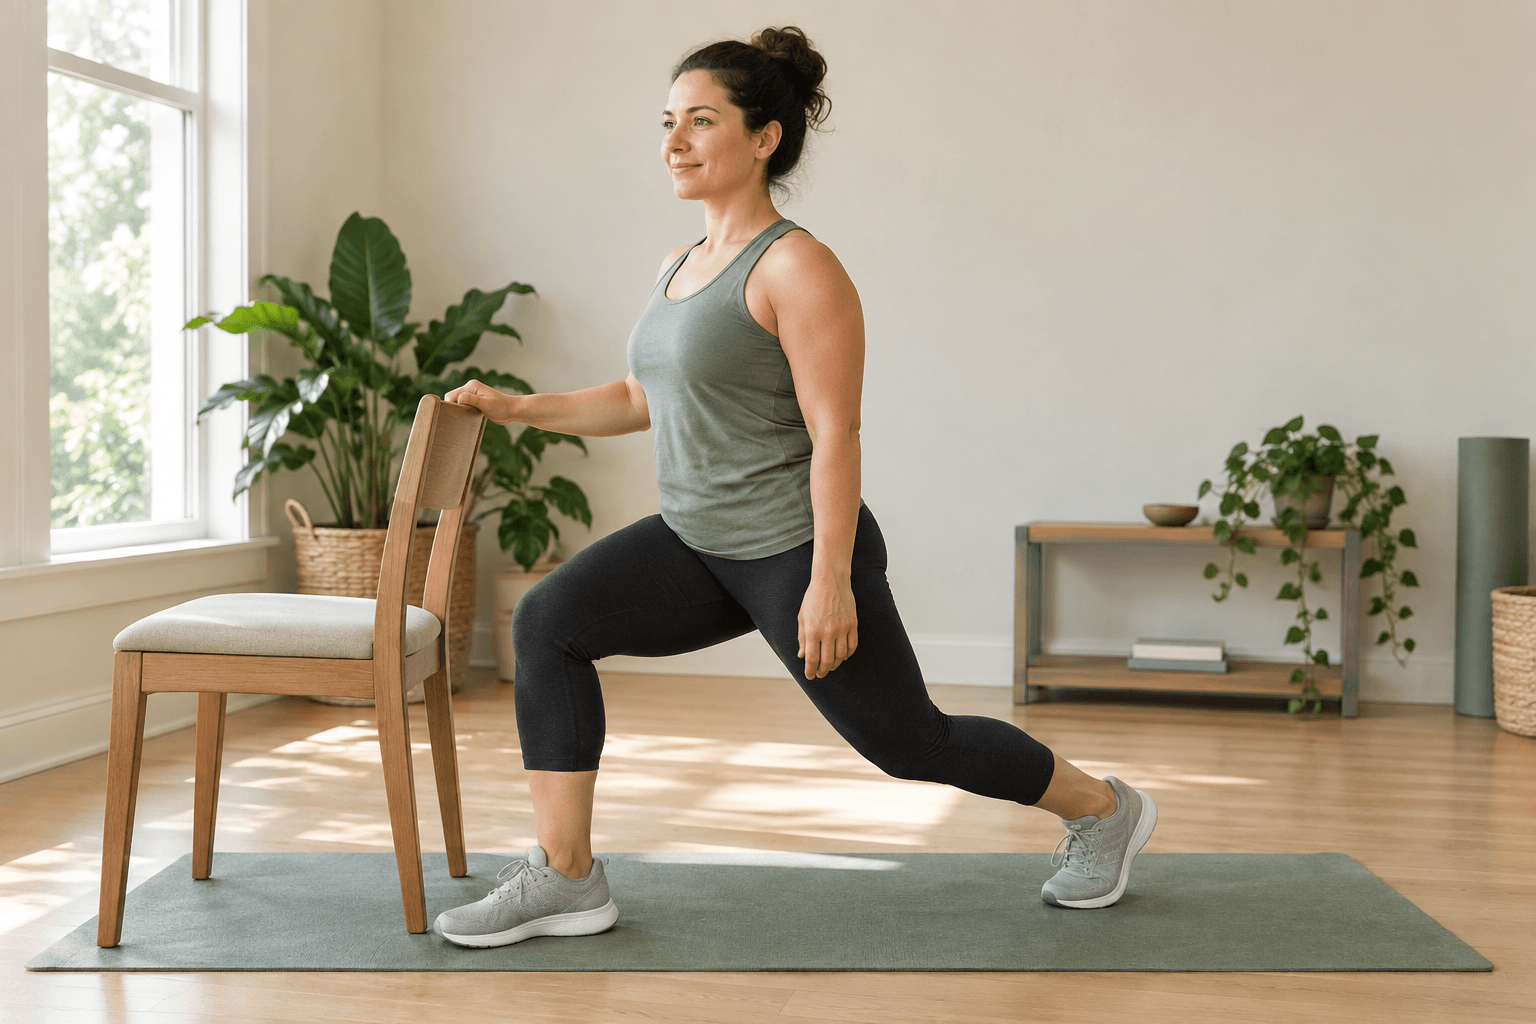
A split squat can feel surprisingly wobbly the first time. Give yourself a handhold from the start so you can concentrate on bending and straightening your legs. Unlike a stepping lunge, your feet stay in place for the whole set.
- Put one foot in front of the other, with some width between them. Imagine each foot standing on its own railway track.
- Rest a hand on a stable chair or rail. Keep your front foot flat and your back heel lifted.
- Bend both knees to lower a little, keeping your front knee moving in the direction of your toes.
- Push through your front foot to rise back to your starting position. Finish your repetitions before switching legs.
A useful check: if you’re spending the whole rep trying not to topple sideways, widen your stance a little or use more support. Start with a small bend; your back knee doesn’t need to touch the floor.
Make it easier: use a shallower range with a secure handhold. If the position still feels unsteady, return to chair sit-to-stands for now.
4. Push-up: push the wall away
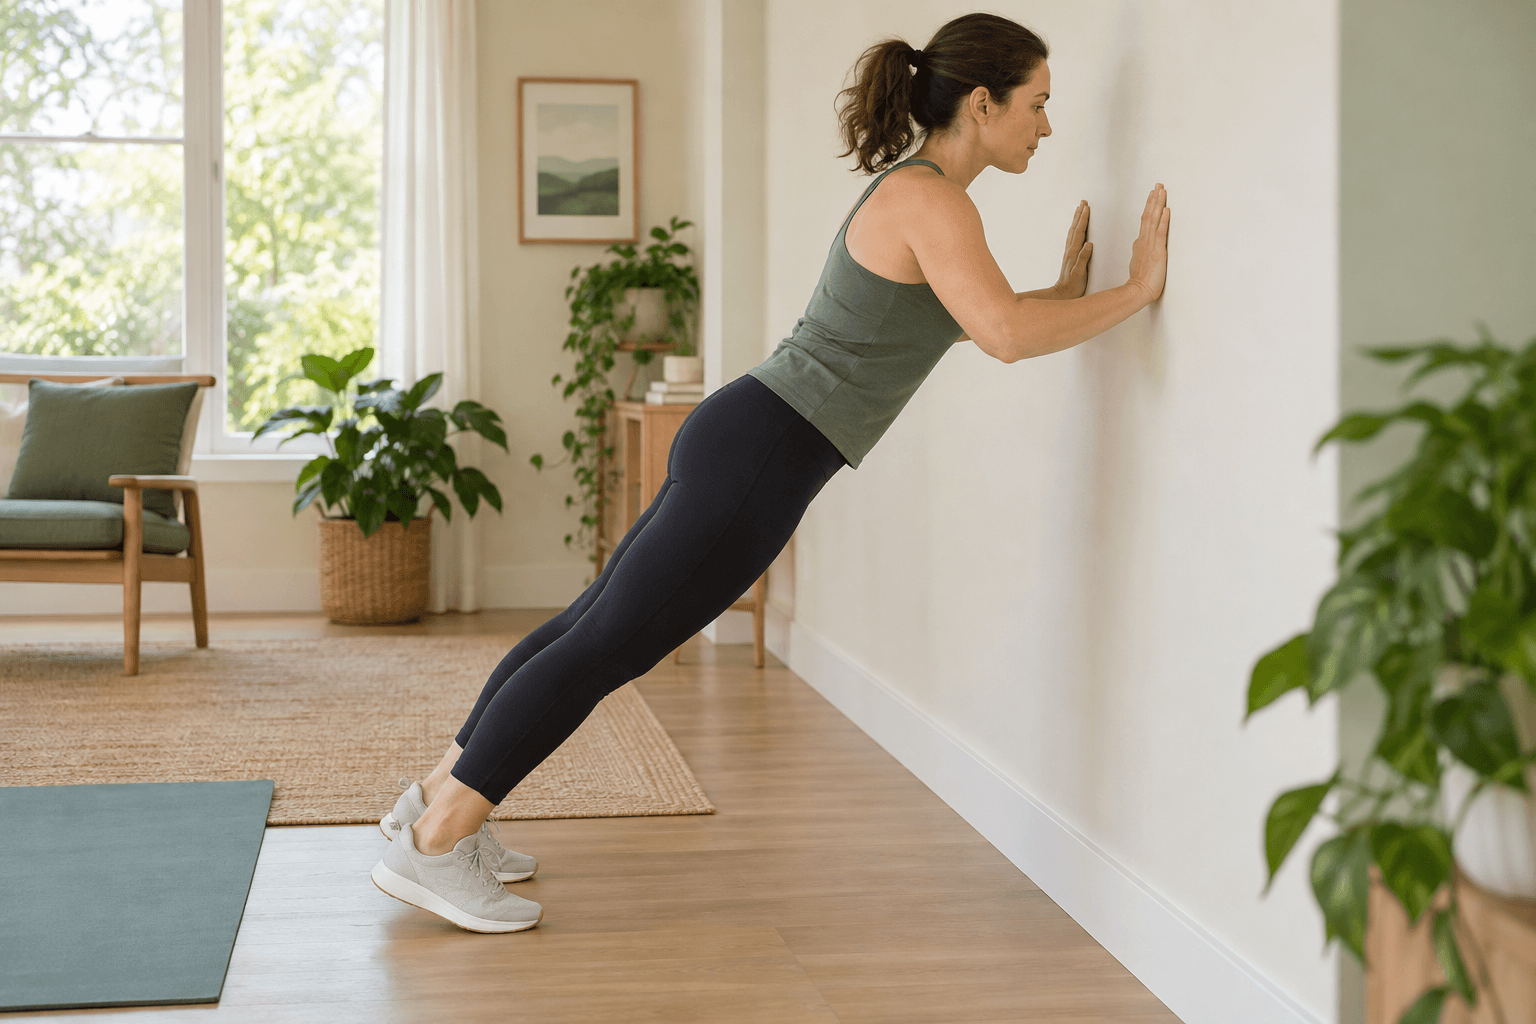
If a floor push-up feels out of reach, start at a wall. You can learn the pushing movement there and adjust the effort simply by moving your feet. It gives your chest, shoulders and arms work to do without having to support as much of your body weight.
- Place your palms on a wall at about chest height, a little wider than your shoulders. Step back into a gentle lean.
- Keep your head, hips and feet roughly in line. Tighten your middle just enough to stop your body sagging, and keep breathing.
- Bend your elbows to bring your chest towards the wall. Let the elbows angle diagonally back.
- Push through your palms to return to the starting position, moving your chest and hips together.
What to notice: your chest should approach the wall along with the rest of your body. If only your head moves forwards, reset and try a smaller bend at the elbows.
Adjust the effort: stand closer to the wall to make it easier. Once wall push-ups feel straightforward, try a fixed, sturdy counter that can safely take your weight.
5. Row: pull your elbows back
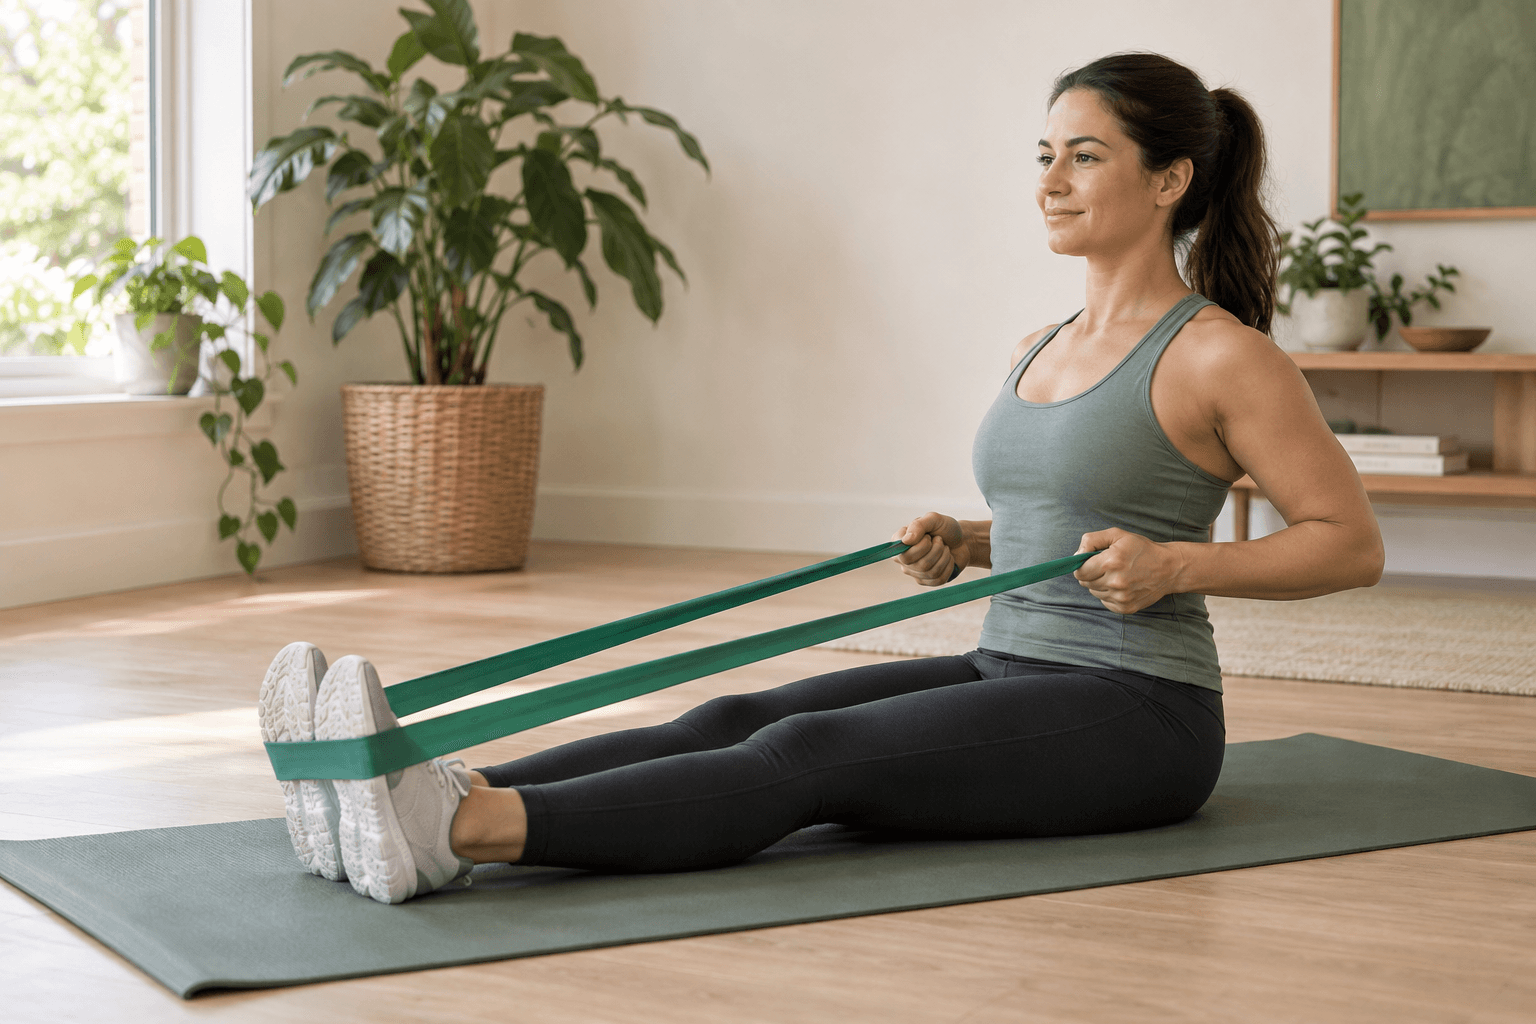
After pushing, it helps to learn a pulling movement too. A row works your back and arms. This seated version uses an exercise band looped around your feet, so the setup matches the image above.
- Sit with your legs in front of you, allowing a small bend in your knees if that helps you sit upright. Loop the middle of a suitable exercise band securely around the soles of both shoes.
- Hold an end in each hand. Keep your toes pointing up so the band stays in place, and gently test the setup before pulling.
- Draw your elbows back alongside your body, bringing your hands towards your lower ribs. Keep your shoulders away from your ears.
- Let your arms move forwards slowly while keeping hold of the band. Stay upright as you repeat.
A useful check: if you have to rock backwards to finish the pull, the resistance is probably more than you need for practice. Choose a lighter band. Stop and reset if it starts to slip on your shoes.
Make it easier: use less resistance and a shorter pull. If sitting on the floor doesn’t suit you, a supported dumbbell row or a seated cable row offers another way to practise pulling.
6. Overhead press: lift a light weight overhead
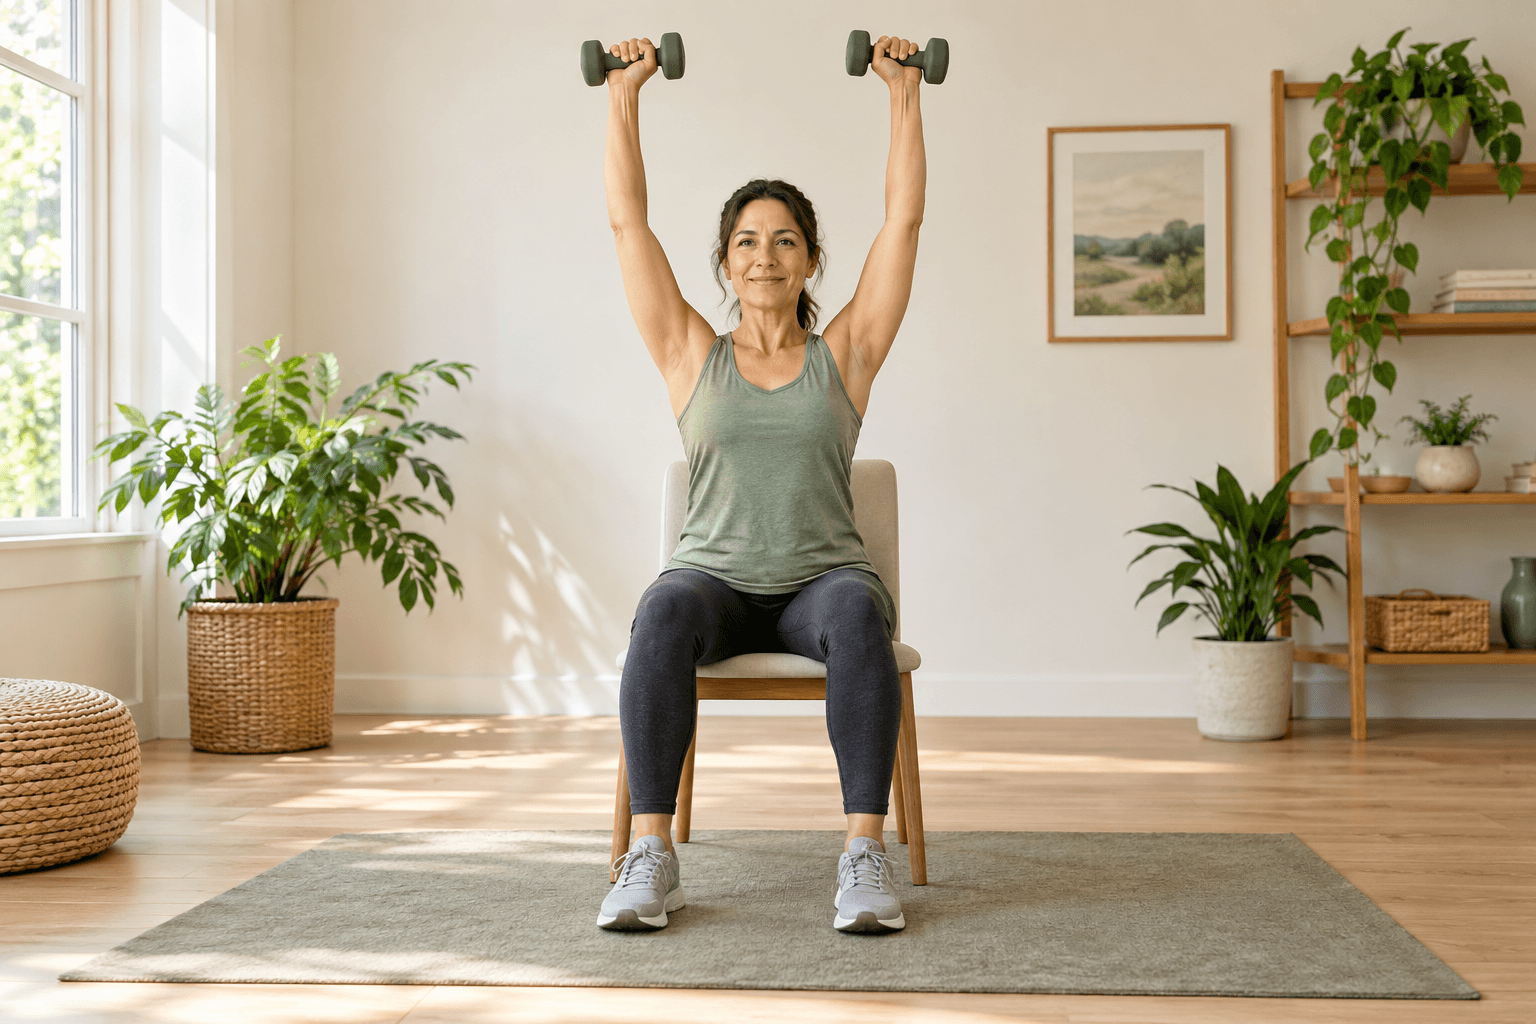
Reaching up to a shelf gives you a familiar picture of this movement. An overhead press adds resistance for your shoulders and arms. Sitting on a stable chair can help you focus on the press without worrying about your balance.
- Sit with your feet flat and your back supported. Hold light dumbbells or securely capped water bottles near your shoulders.
- Keep your wrists straight and your elbows beneath your hands. Settle your ribs over your hips.
- Press upwards through a range that feels smooth. Keep breathing, and avoid snapping your elbows straight.
- Lower the weights back towards your shoulders slowly enough that you could pause along the way.
A useful check: notice whether you lean backwards to get the weights higher. If you do, reduce the weight or the range. There’s no need to force your arms into a position that pinches.
Make it easier: practise with empty hands first. If reaching overhead hurts, leave this movement out and get advice on an alternative that suits your shoulders.
7. Plank: brace and keep breathing
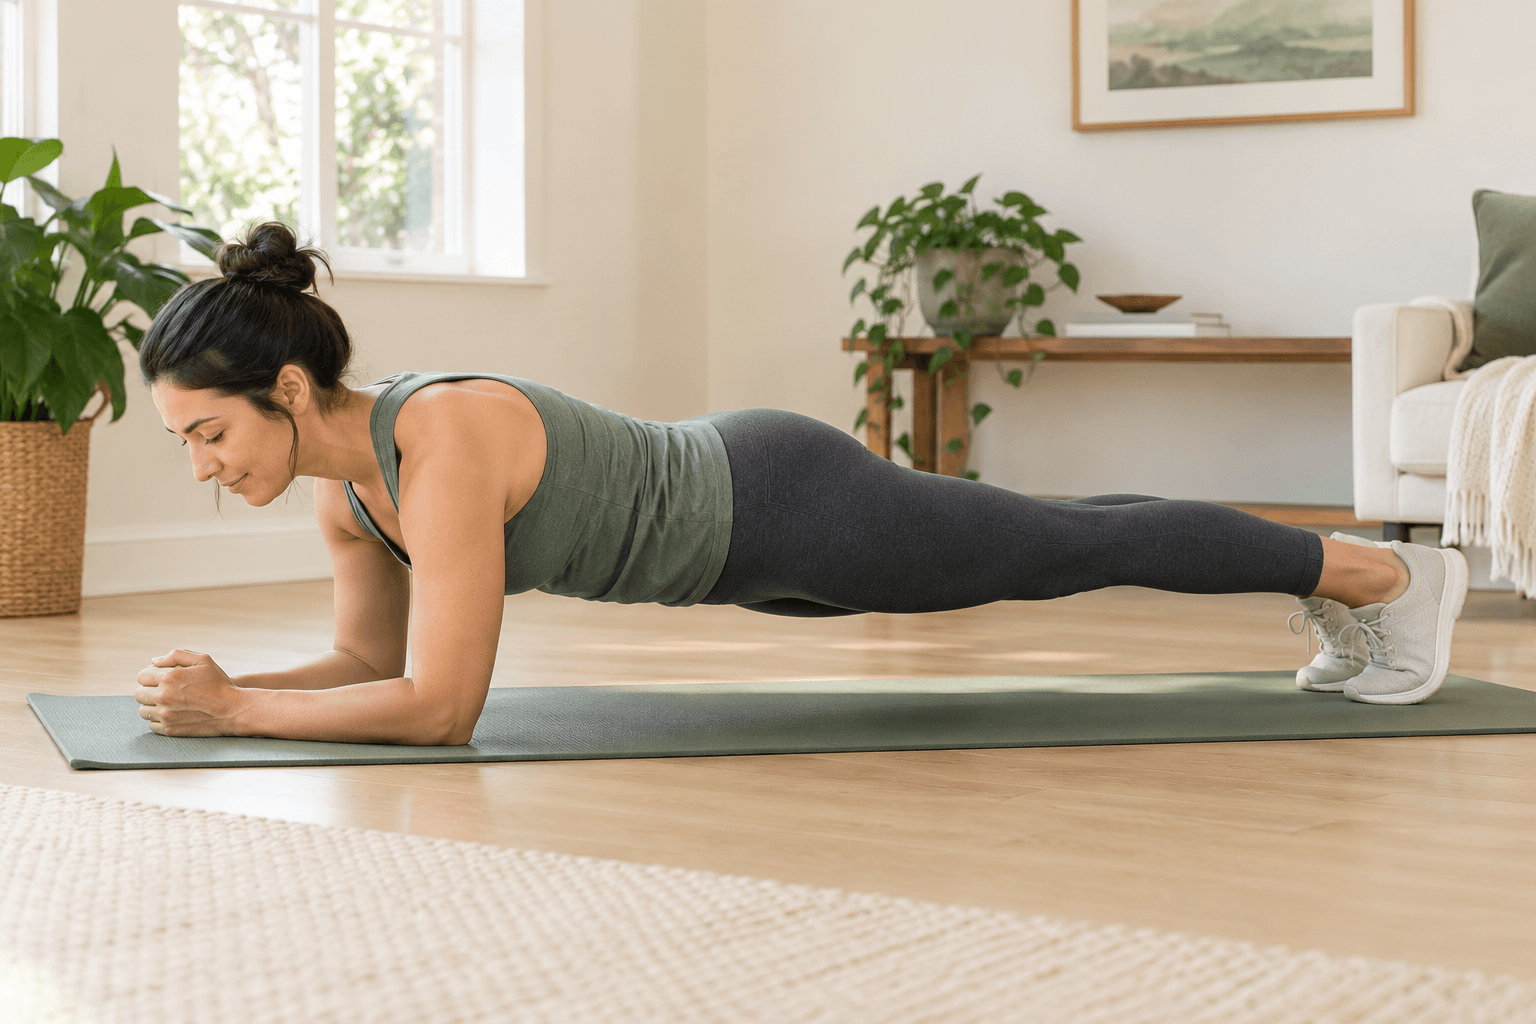
A plank looks still, but your middle is working to hold you in position. Start with a brief hold so you have time to notice your breathing and where your hips are. You can build from there.
- To try the floor version shown above, begin on your forearms and knees. Place your elbows underneath your shoulders.
- Gently tighten your stomach and buttocks. Keep your knees down for an easier version, or extend your legs and support yourself on your toes.
- Look down towards the mat and hold a steady line through your body. Breathe normally.
- Start with a short hold, perhaps 10–20 seconds, then lower your knees and rest. Stop sooner if your back begins to sag.
What to notice: holding your breath can make it hard to judge the effort. See whether you can take a few easy breaths while keeping your hips steady. End the hold when you can no longer do both.
Make it easier: rest your forearms on a wall or a sturdy counter and step your feet back a little. This lets you practise bracing without getting onto the floor.
Put them into a simple week
Pick two days you can realistically come back to: Monday and Thursday, for example. Leave at least a day between strength sessions while you learn how you recover. Repeating the same exercises for a while also saves you having to learn a new routine every time.
Here’s a starting session to try once you’ve worked through the setups. These amounts are examples, so adjust them to what you can manage today.
| Movement | First-session example | Scale it down |
|---|---|---|
| Squat | 1 set of 6–10 | Sit-to-stand |
| Hip hinge | 1 set of 6–10 | Wall-tap hinge |
| Split squat | 1 set of 5–8 each side | Hold support; shallow bend |
| Push-up | 1 set of 6–10 | Stand closer to the wall |
| Row | 1 set of 8–12 | Use less band tension |
| Overhead press | 1 set of 6–10 | Practise without weights |
| Plank | 1 hold of 10–20 seconds | Use a wall or counter |
Rest between exercises until you’re ready to get into the next position. When one set feels manageable and you’re recovering well, you might add a second set at a later session. As you gain experience, aim for the last few repetitions to feel like work while still leaving enough control to do another couple.
Keep a small note of what you did. “Eight chair squats; used my hands on the last two” tells you more than simply ticking “workout” off a list. Next time, you’ll have a useful starting point. Add a repetition, a little resistance or a set when you’re ready, changing one thing at a time.
Strength work is one part of an active week. The CDC’s adult guidance recommends working all major muscle groups on at least two days a week, alongside 150 minutes of moderate aerobic activity, such as brisk walking. You can build towards that in smaller chunks.
The ACSM’s 2026 guidance also supports keeping a routine manageable: regular strength training matters, and bands, body weight and home workouts can all be useful. Choose a level of effort you can keep coming back to.
Good form is something you can repeat
For your next session, choose one cue per exercise to pay attention to: feet planted during a squat, hips moving back in a hinge, an easy breath during a plank. Trying to remember every instruction at once can make a simple movement feel much harder to learn.
You may find you wobble less, need a little less help from the chair or can lower a weight more slowly. Those are useful things to notice alongside your rep count. If you’re unsure about a movement, a qualified trainer or physiotherapist can watch you and help you adjust it.
When you finish, make a note of what felt manageable and what needs another try. Put your next session in the calendar. You’ll have something familiar to return to, with one or two small things to practise.
Your questions
Are these the only exercises I need?
Think of them as a useful starting routine. You can swap a squat for a leg press or a band row for a cable row if that works better for you. You’ll also want some aerobic activity, such as brisk walking, alongside your strength sessions. There’s plenty of room to build a routine you enjoy.
How many repetitions should a beginner do?
Try the ranges in the table as a starting point, usually around 6–10 repetitions. Stop earlier if you begin rushing, straining or losing your position. Once a set feels manageable, add a repetition or a little resistance. You can learn more from six steady reps than from forcing your way through ten.
Do I need gym equipment?
You can practise most of these movements with a wall, a stable chair and a patch of floor. For the seated row shown here, you’ll need an exercise band; light dumbbells or securely capped water bottles can work for the press. You don’t need to buy everything before trying your first few movements.
Should I be sore after every workout?
No. You might feel a little stiff after trying something new, but a workout can be useful without making the next day uncomfortable. If soreness makes everyday tasks difficult, ease back next time. Sharp or worsening pain is a reason to stop and get advice, rather than something to work through.
References
- American College of Sports Medicine. Resistance Training Guidelines Update, 2026. acsm.org
- Centers for Disease Control and Prevention. Adult Activity: An Overview. cdc.gov
- NHS. Strength and Flex exercise plan: how-to videos and safety information. nhs.uk
- NHS. Strength exercises: sit-to-stand, mini-squats and wall press-ups. nhs.uk
- American Council on Exercise. Exercise Library: photos and step-by-step form guides. acefitness.org
- University of Illinois Extension. Seated Row: exercise-band setup and movement instructions. eat-move-save.extension.illinois.edu
- American Council on Exercise. The ACE Do It Better Series: The Romanian Deadlift, 2025. acefitness.org